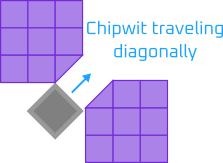
In Surprising Diagonal Movement Challenges, I mentioned that 9 slicing walls (a.k.a. wall slicing) is our solution to prevent the ChipWit from appearing to be stuck inside a square when it is actually allowed to move diagonally. The ChipWit wants to get that pie, but can it escape?
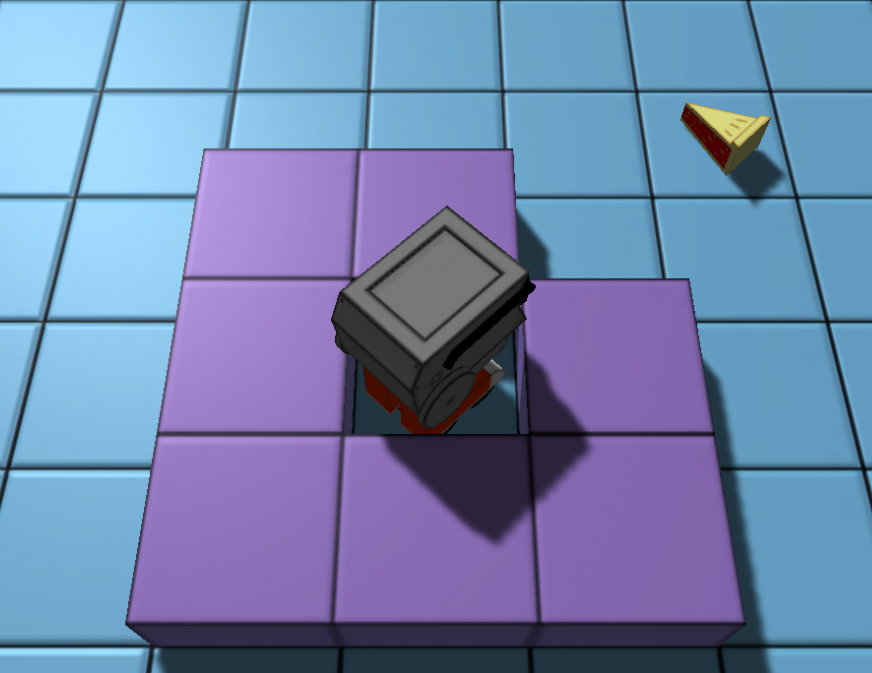
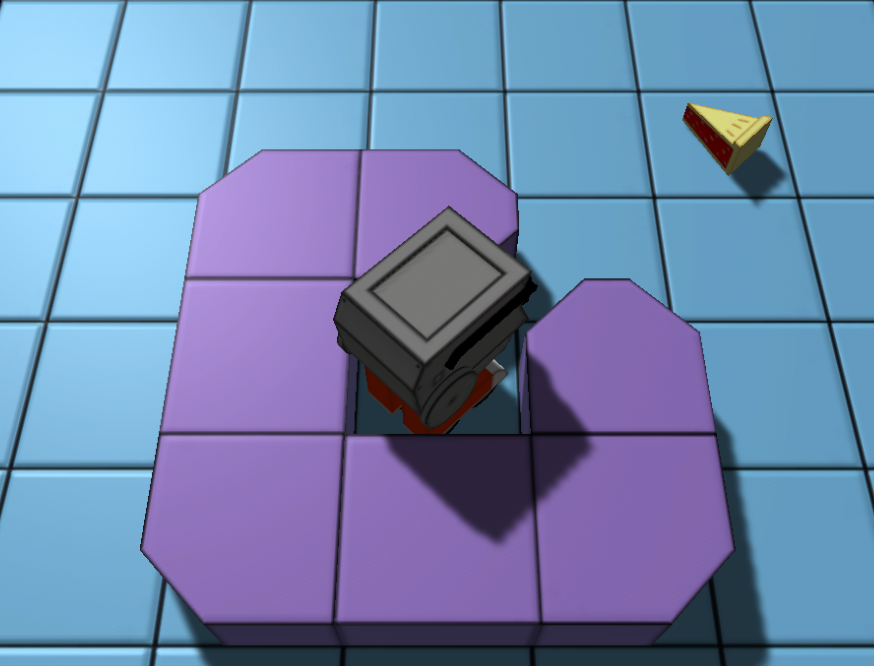
With wall slicing, it’s obvious to the player that it is okay to move diagonally through the walls.
To achieve this effect, our immediate thought was to use a technique very similar to 9-slice scaling. However, after investigating it further it turns out the problems are quite different.
Let’s expand on how our technique is similar and different to the concept of 9 slice scaling and some of the implementation challenges around achieving this effect.
What is 9 slice scaling?
The technique of 9 slice scaling was originally introduced by Macromedia Flash in 2005. In the scaling application, there is a need for a graphic asset (vector or bitmap) to scale vertically or horizontally without skewing the aspect ratio of the sides and corners. For example, consider a case where a label does not fit on a button:

To fix this, we could just scale the button image to ensure the label fits inside, but that gets ugly. The aspect ratio of the corners is not right with respect to the image, and it gets pixelated on the sides:

To solve this problem, we can slice the image into 9 sections. When scaled, the corners (1, 3, 7, 9) will stay as-is. The top sides (2, 8) will scale horizontally only. The sides (4, 6) will scale vertically only. The center will scale both horizontally and vertically:
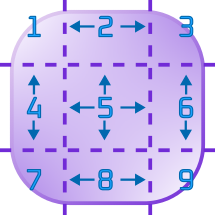
The result is a much nicer looking button:

ChipWits, like many games, uses 9-slice scaling to do its UI buttons, frames, and other graphic elements.
How is wall 9-slicing different?
The reboot of ChipWits took inspiration from this technique in order to implement sliced walls. At first, we thought these two techniques would end up being quite similar. Instead of being about scaling, this is about shaving off parts of the wall so the ChipWit can fit through. However, it turns out to do this requires a bit more work.
First, in Blender we did four edge-cut loops to cut the wall into 9 sections:
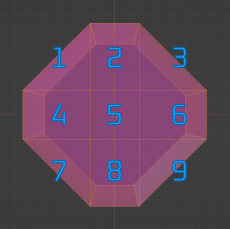
At first we cut the mesh evenly in thirds, but later we discovered that didn’t provide a wide enough corridor for the ChipWit to travel diagonally. The 9-slicing allowed us to adjust the scale of the corners of the mesh to allow sufficient room.
But this is where the similarity with 9-slice scaling ends. If we slice all the corners, then we can’t get a square wall or a wall with only one corner sliced.
But how many different meshes do we need? What if two corners need to be sliced? Three corners? What if the corners are adjacent? Opposite? Do we need all combinations of corners? There are four corners, so that would be:
That’s a lot of meshes to maintain! Fortunately, we worked out that there are only 4 meshes we ever need (the rest are rotations of these):

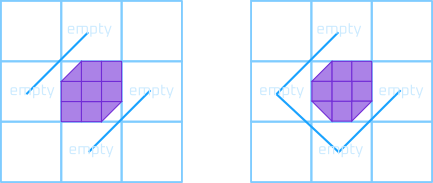
Wait, what about walls with 3 corners sliced, or walls with 2 opposite corners sliced? It turns out those patterns never come up in practice. Why not? We can prove it as follows:
For those patterns to be necessary, the north, south, east and west squares would all need to be empty. And if they are empty, then it is possible for the ChipWit to pass by diagonally across any corner, so they all need to be sliced anyway. Also, there are no flat sides so we never have a case where we need the other corner(s) to be present in order to connect to an adjoining wall:
Texturing the walls
After we have our meshes, we need to texture our walls. texture maps look like this (this is for a tileset that outlines the walls):
Choosing the slices
With all the assets prepared, now we have to choose which slices to use while we’re editing our mission maps. At first, we decided to do this by hand in our mission file format, forcing the mission designer to slice the walls themselves. But this was very time consuming and error prone, so we changed the code to automatically choose the appropriate slices depending on the wall layout.
The psuedo-code for the algorithm that does the wall slicing looks like this:
#  b-a
#  | |
#  c-d
#
# Sets a, b, c and d to True if the corner should be present.

onRoomEdge = <Is this square on the edge of the room?>

onNECorner = <Is this square on the northeast corner of the room?
onNWCorner = <Is this square on the northwest corner of the room?
onSWCorner = <Is this square on the southwest corner of the room?
onSECorner = <Is this square on the southeest corner of the room?

e = <Tile to the east>
n = <Tile to the north>
w = <Tile to the west>
s = <Tile to the south>

wallE = e.TileType is a Wall
wallN = n.TileType is a Wall
wallW = w.TileType is a Wall
wallS = s.TileType is a Wall

a = wallE | wallN | onNECorner
b = wallN | wallW | onNWCorner
c = wallW | wallS | onSWCorner
d = wallS | wallE | onSECorner
Floors and walls
The final surprise was when we went to view the resulting rooms and then realized that there were holes in the floors!

Of course, with the wall sliced, the tiles needs floors under them. We wrote some code to intelligently pick an adjacent tile and duplicate that to fill the hole. This way, the mission designer doesn’t need to explicitly choose which floor tile goes under each wall.
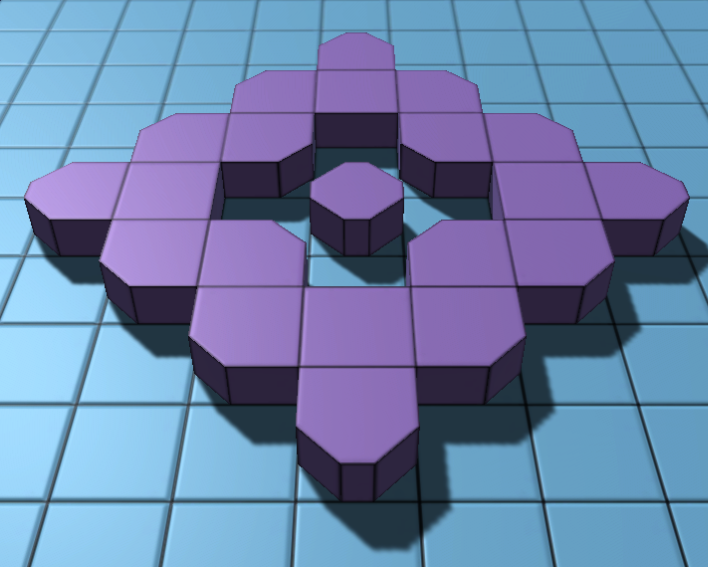
Here is the final result. In our mission file, we can draw the walls:
"tiles" : [
  "...........",
  ".....#.....",
  "....###....",
  "...##.##...",
  "..##.#.##..",
  "...##.##...",
  "....###....",
  ".....#.....",
  "..........."
],
And the game engine automatically renders them like this:
Conclusion
Phew! That was a lot of work.
But the end result is much cleaner level design and less work for the mission designer. We’ve really been enjoying creating levels with our new sliced walls, and we hope you enjoy playing them when the reboot is released!
Discussion
What are your thoughts on our new sliced walls? Have you seen other novel uses of 9-slicing aside from scaling and wall slicing? Write your comments below!






Leave a Reply